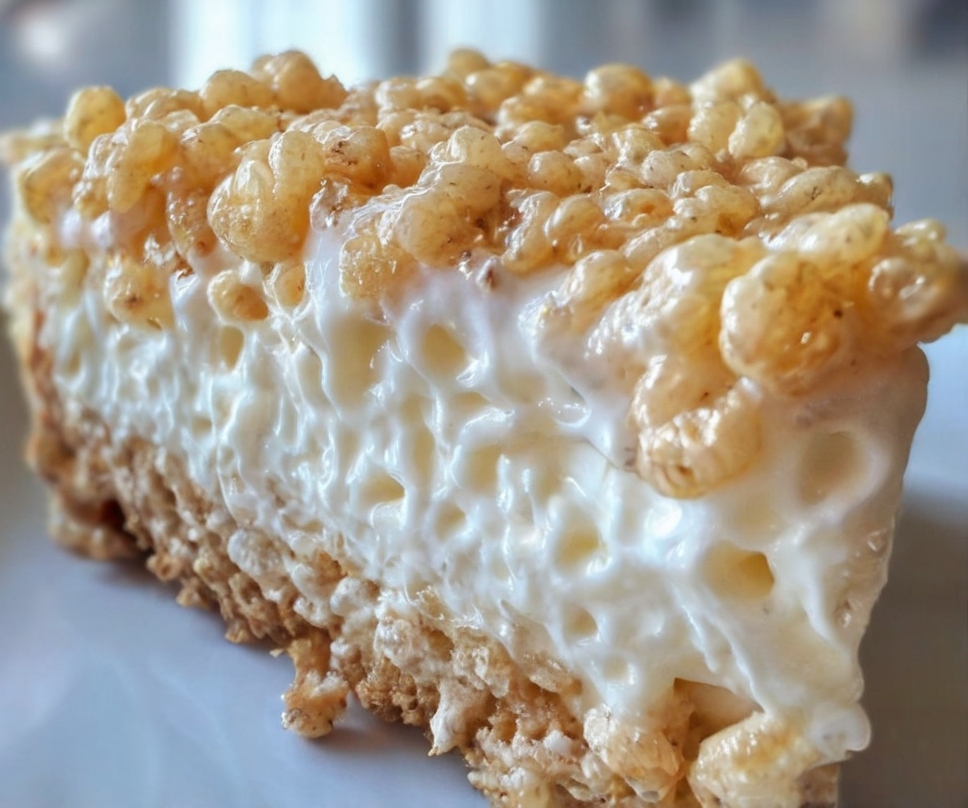
An easy, creamy, and irresistible Rice Krispy Treat No-Bake Cheesecake that blends crunchy cereal with smooth cheesecake filling for a perfect dessert every time.
Why You Will Love This Recipe
This Rice Krispy Treat No-Bake Cheesecake is more than just a dessert. It is a moment of comfort, joy, and creativity in your kitchen. It requires no oven, no complicated techniques, and no stress. With its crispy base and silky filling, it delivers both texture and flavor in every bite, making it perfect for busy days, family gatherings, or late-night cravings.
Kitchen Tools You Will Need
– Large saucepan
– Wooden spoon or spatula
– Mixing bowls
– Electric mixer or whisk
– 9-inch springform pan
– Measuring cups and spoons
– Rubber spatula
Ingredients
– 3 cups Rice Krispies cereal
– 1/4 cup unsalted butter
– 1 package (10 oz) marshmallows
– 16 oz cream cheese, softened
– 1 cup powdered sugar
– 1 teaspoon vanilla extract
– 1 cup heavy whipping cream
Step-by-Step Instructions
1. Melt the butter in a large saucepan over low heat.
2. Add the marshmallows and stir until fully melted and smooth.
3. Remove from heat and mix in the Rice Krispies until coated.
4. Press the mixture into a 9-inch springform pan to form the crust.
5. Beat the cream cheese until smooth.
6. Add powdered sugar and vanilla, then mix well.
7. Whip the heavy cream until stiff peaks form.
8. Fold the whipped cream into the cream cheese mixture gently.
9. Pour the filling over the crust and spread evenly.
10. Refrigerate for at least 4 hours until firm.
Tips for Perfect Results
– Always use room-temperature cream cheese for a smooth texture.
– Do not overmix after adding whipped cream.
– Chill overnight for best firmness.
– Press the crust firmly to prevent crumbling.
– Use fresh marshmallows for better melting.
Variations and Additions
You can personalize this cheesecake in many ways. Add chocolate chips to the filling, drizzle caramel sauce on top, or mix crushed cookies into the crust. For a fruity touch, top it with strawberries or blueberries. Peanut butter lovers can swirl peanut butter into the filling for extra richness.
Storage and Reheating
Store the cheesecake in an airtight container in the refrigerator for up to 4 days. It is best served cold, so reheating is not recommended. If frozen, wrap tightly and freeze for up to one month. Thaw overnight in the refrigerator before serving.
Nutritional Information (Per Serving)
– Calories: 380 kcal
– Carbohydrates: 45 g
– Protein: 6 g
– Fat: 20 g
– Sugar: 30 g
Preparation Time
Preparation Time: 20 minutes
Cooking Time: 10 minutes
Chilling Time: 4 hours
Total Time: About 4 hours and 30 minutes
Servings: 8
Frequently Asked Questions
Can I use low-fat cream cheese?
Yes, but the texture may be less creamy and slightly softer.
Can I make this recipe ahead of time?
Absolutely. Preparing it one day in advance improves flavor and texture.
Why is my cheesecake too soft?
This usually happens if the whipped cream was not stiff enough or chilling time was too short.
Can I use other cereals?
Yes, you can experiment with cornflakes or chocolate cereal for different flavors.
How to Achieve the Perfect No-Bake Cheesecake Texture
The secret lies in balance. The crust must be compact but not hard, while the filling should be airy yet stable. Whipping the cream properly and folding it gently creates that light, cloud-like texture that melts in your mouth.
Final Tip
Make this cheesecake when you want to feel proud of a simple yet impressive dessert. Trust the process, enjoy every step, and remember: the best recipes are made with patience, passion, and a little courage to try something new.